So, after offloading some fileshares to optimized NAS-storage (I think it is EMC? Or Dell? or something else) – we noticed that a new server had issues connecting to (mapping) the fileshare using the system account. Connecting as a user worked without issues, however any connection attempt by the system-account itself caused some issues.
Error looks like this;
System Error 1808 has occured. The account used is a computer account. Use your globl user account or local user account to access this server.
So, we found some generic articles and quite often the resolution pointed to a change on the NAS-side (VNX has an article), or switching to a Windows-server as the host resolving – however, the amount of data was to much to move around and the legacy server didn’t have any issues.
It seems that this relates to Encryption Types for kerberos. Altering the below key should be a sledge-hammer, and most likely you can tweak it to maintain some level of security.
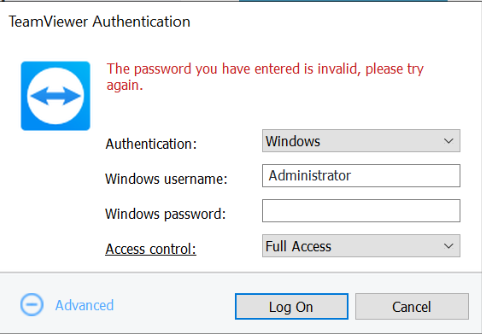
Teamviewer has a great article howto handle User Account Control prompts within QuickSupport or similiar solutions, and as part of that you are intended to provide your own credentials when connecting. There are a few caveats that will unfortunately provide little insight when trying to connect and might indicate a simple failure. If presented with an error message like this when attempting to logon:
The password you have entered is invalid, please try again.
You might want to ignore the wording, and consider it a simple denied logon…
Why would you be denied logon then?
You, or the user account you are using, is denied interactive login. Yes, Teamviewer will simply restart the application using an interactive login to overcome the UAC-prompt – and if your account is denied interactive login this will not work.
You are using an account which doesn’t exist. This may be a local account, an Active Directory Domain account, or an Azure Active Directory Domain account. Verify that the account exists – and that you have entered it correctly in the username-box
To logon with local credentials – type in the username the following format; Yourusername
To logon with Active Directory Domain credentials – type the username in the following format: Yourdomain\Yourusername
To logon to an Azure Active Directory – type the username in the following format: Azuread\yourusername@yourdomain.com
Note that anything in bold should be written as-is.
Potentially – you could be mistyping your password aswell.
Verify account expiration, locked out and all the normal variations of a denied logon in general.
So you have implemented Pulse Secure as a VPN-solution? Well, here are somethings that just about every consulting firm or department eventually will ask you to implement along-side it – so the Pulse Secure client works. The details aren’t here – but more the general mindset, what todo when – but not exactly how every scheduled task / script looks like. Hopefully this will guide you – and potentially arm you with possibility to fix more problems in the future.
Triggers
First things first – a great way to trigger activity is based on Pulse Secure events – described more in detailed on their admin-guide. Common event-ids that might be useful are;
Disconnect – 302 / 106
Connect – 312 (not documented)
To create a scheduled task for any event – simply find a sample event a select to create a Scheduled Task;
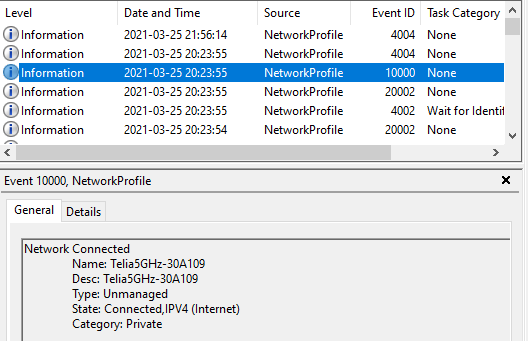
In addition to Application and Services log / Pulse Secure, you can always find Microsoft-Windows-NetworkProfile/Operational. This contains great entries for what network you connect to, what network profile type of profile you connect to. Event-id 1000 within NetworkProfile is simply that you are connected to a new network as a sample.
Actions
What actions will be asked to run when these events happen?
Re-register DNS
Name-resolution for the helpdesk not quick-enough to connect to your laptop once you are connected? On event Connect (detected by Pulse Secure/Operational and the event id 312) you can simply have the scheduled task run the command-line – and this will mitigate some stuff.
ipconfig /registerdns
DNS Suffix search list
Pulse normally appends the searchlist of the DNS-suffixes that are set on your client. It also fails to clean this up properly – so name resolution after a disconnect can be challenging. A tidy way todo this would be to trigger on a disconnect (primarily event id 302 within Pulse Secure, but also 106 might be applicable) and then do a sweep. Sample code;
SuperUser has some options if you have a longer list of suffixes to handle..
Host-checker antivirus check
Did someone implement a host-checker and decided something needs to be up-2-date? Like antivirus definitions? Use trigger NetworkProfile with EventID to identify that a device has successfully connected to a network, and then do a check which network – and if not the corporate one – start up the processes to ensure users can avoid having a failed connect.
Sample functions (to check what network and do a validation of Defender AV Signature) – in VBscript as this was to be firing of quite heavily on all endpoints.
Private Function NetConnectionProfileName(Network)
	Dim objWMIService
	Dim colItems

	NetConnectionProfileName = False

	On Error Resume Next
	Set objWMIService = GetObject("winmgmts:\\.\root\StandardCimv2")

	Set colItems = objWMIService.ExecQuery("Select * From MSFT_NetConnectionProfile")

	For Each objItem in colItems
		if objItem.Name = Network Then
			NetConnectionProfileName= True
		End if
	Next

	Set objWMIService = Nothing

End Function

Private Function DefenderSignatureUpdate
	Dim objWMIService
	Dim colItems

	DefenderSignatureUpdate = False

	On Error Resume Next
	Set objWMIService = GetObject("winmgmts:\\.\root\Microsoft\Windows\Defender")

	Set colItems = objWMIService.ExecQuery("Select * From MSFT_MPComputerStatus")
	Wscript.echo "Definition-update: " & Left(objItem.AntivirusSignatureLastUpdated,8) & "Today: " & year(now())&right("00" & month(now),2)&right("00" & Day(now),2)
	For Each objItem in colItems
		if Left(objItem.AntivirusSignatureLastUpdated,8) = year(now())&right("00" & month(now),2)&right("00" & Day(now),2) Then

			DefenderSignatureUpdate = True
		End if
	Next


	Set objWMIService = Nothing

End Function
A similiar way within Powershell to detect a Domain-profile is posted on Twitter:
Garbage code is garbage, but effectively: $ConnectedProfiles = Get-CimInstance -ClassName MSFT_NetConnectionProfile -Namespace root/StandardCimv2 if ($ConnectedProfiles.NetworkCategory -like "*2*") { Write-Log "Yay you're fine and Windows thinks you're on the Domain!" }
Windows Firewall profile doesn’t always switch to Domain when you use a third-party VPN client
This isn’t really an action. You could most likely trigger something off the event ids – however, Microsoft has documented a great article about this problem. Pulse allegedly fixed this in a really old-version of the client, but to this day noone is happy about it. Set the two workarounds as part of your baseline for devices connecting via VPN – and you should be good. Pulse (now owned by Ivanti) will not be fixing this it seems. As far as I can tell Pulse adds routes, and then doesn’t notify Windows in anyway that triggers a rediscovery for Domain-connections.
Microsoft states:
First, disable Domain Discovery negative cache by adding the NegativeCachePeriod registry key to following subkey: HKEY_LOCAL_MACHINE\SYSTEM\CurrentControlSet\Services\NetLogon\Parameters Name: NegativeCachePeriod Type: REG_DWORD Value Data: 0 (default value: 45 seconds; set to 0 to disable caching)
If issue doesn’t resolve, further disable DNS negative cache by adding the MaxNegativeCacheTtl registry key to the following subkey: HKEY_LOCAL_MACHINE\SYSTEM\CurrentControlSet\Services\Dnscache\Parameters Name: MaxNegativeCacheTtl Type: REG_DWORD Value Data: 0 (default value: 5 seconds; set to 0 to disable caching)
Force a new network-profile
Your client still skipping around and not getting stuff right? Well, you can switch over to a Private Profile. Public is by default, and Domain requires that a Active Directory is reachable (process documented in previous article from Microsoft) – but Private you can switch to.
See this one-liner to detect a specific network and switch the Network Profile
This is how you deploy Bitlocker and make everyone fall in love with you.
1. Don’t understand Bitlocker – and read some generic Microsoft guideline which provides you with a generic approach and doesn’t compensate for your lack of understanding
2. Don’t read Adams detailed walk-through, and in particular skip the section regarding PCR Settings if you are deploying this in a pre-Windows 10 / SecureBoot era.
(or the gist: enable PCR validation: 0, 1, 8, 9, 10, & 11 only for legacy BIOS)
3. Really don’t make an effort to push this forward to a SecureBoot era where the annoyance for all users are minimal.
4. Don’t validate any hardware – any BIOS-versions, TPM versions or anything that could potentially have an impact on the experience of Bitlocker.
5. Don’t test anything and just assume that it works as all the guidelines that say you “must” do this will never have any negative impact (and is there a section which says impact? don’t read it)
(Interactive logon: Machine account lockout threshold should match your account lockout setting and also not be as low any given user will force the machine into recovery mode every single day)
6. If the a user is forced to provide a Bitlocker Recovery Key – don’t reset the platform validation data. Most likely the Bitlocker Recovery key will not show up during the next reboot.
7. Make sure you configure stuff – especially things that contradict the initial setup state of Bitlocker. Future assumptions made by Microsoft will surely not impact you.
8. Sighs. Why? This seems to be required if using the Machine Account lockout threshold….
“Windows Settings” – “Security Settings” – “Local Policies/User Rights Assigment”
“Access this computer from the network” – “BUILTIN\Administrators” – append: “NT AUTHORITY\Authenticated Users”
To start of this blog-post we have to set a few basics…
Windows 10 20H2 includes Edge Chromium. Specifically – Edge Chromium v84 (something something)
If you deploy Edge Chromium later version (like 87? 88?) to your 1909/2004 devices – and then upgrade to Windows 10 20H2, you will effectively downgrade Edge Chromium to 84.
As far as I can understand – the details, the workarounds and apparently a promise that this will be better is all published on Borncity.
The issue at hand though is that Edge Chromium is a moving target, so including even the latest version today in whatever upgrade process you have – will most likely in a months time have an older version than what you have installed on your endpoint. This is installer will bomb-out with “there is a newer version already installed”. Yet, the users will be stuck with Edge Chromium 84. I don’t quite get why this is the case. The previous version is installed, but version 84 always starts and you can’t upgrade because of this and for some reason Edge Chromium is special software that just doesn’t tag along?
Now, to workaround this you can read the information regarding the installed Edge Chromium (it is installed, just not running) and then perform an over-ride (REINSTALL=ALL REINSTALLMODE=A according to the comments on Borncity).
Let’s gather what we need to create something simplistic.
Function to retrieve installed software in Powershell. There are a bunch out there. You can use PSADT. I just found one that was small and did the trick. I can see so many problems with it – but it works. Unfortunately I have no idea where I stole this from. If you want todo properly – use PSADT. If I stole this from you – post a comment and I will remove it and post a link instead.
function Get-InstalledSoftware {
    <#
    .SYNOPSIS
        Retrieves a list of all software installed
    .EXAMPLE
        Get-InstalledSoftware

        This example retrieves all software installed on the local computer
    .PARAMETER Name
        The software title you'd like to limit the query to.
    #>
    [OutputType([System.Management.Automation.PSObject])]
    [CmdletBinding()]
    param (
        [Parameter()]
        [ValidateNotNullOrEmpty()]
        [string]$Name
    )

    $UninstallKeys = "HKLM:\Software\Microsoft\Windows\CurrentVersion\Uninstall", "HKLM:\SOFTWARE\Wow6432Node\Microsoft\Windows\CurrentVersion\Uninstall"
    $null = New-PSDrive -Name HKU -PSProvider Registry -Root Registry::HKEY_USERS
    $UninstallKeys += Get-ChildItem HKU: -ErrorAction SilentlyContinue | Where-Object { $_.Name -match 'S-\d-\d+-(\d+-){1,14}\d+$' } | ForEach-Object { "HKU:\$($_.PSChildName)\Software\Microsoft\Windows\CurrentVersion\Uninstall" }
    if (-not $UninstallKeys) {
        Write-Verbose -Message 'No software registry keys found'
    } else {
        foreach ($UninstallKey in $UninstallKeys) {
            if ($PSBoundParameters.ContainsKey('Name')) {
                $WhereBlock = { ($_.PSChildName -match '^{[A-Z0-9]{8}-([A-Z0-9]{4}-){3}[A-Z0-9]{12}}$') -and ($_.GetValue('DisplayName') -like "$Name*") }
            } else {
                $WhereBlock = { ($_.PSChildName -match '^{[A-Z0-9]{8}-([A-Z0-9]{4}-){3}[A-Z0-9]{12}}$') -and ($_.GetValue('DisplayName')) }
            }
            $gciParams = @{
                Path        = $UninstallKey
                ErrorAction = 'SilentlyContinue'
            }
            $selectProperties = @(
                @{n='GUID'; e={$_.PSChildName}},
                @{n='Name'; e={$_.GetValue('DisplayName')}}
            )
            Get-ChildItem @gciParams | Where $WhereBlock | Select-Object -Property $selectProperties
        }
    }
}
Second you need something to validate that MSIExec isn’t busy. Like the function Test-IsMutexAvailable from (you guessed it) PSADT. Come to think of it – you really should just throw everything I did in a garbage bin and rewrite it using the PSADT framework.
Third – here is the crude and basic logic of what we want to run after the Windows 10 20H2 upgrade is completed.
Consists of – arguments to run the re-install of Edge. Oddly – the latest version should have a ProductCode, but not version 84 which comes in the box. Then wait until MSIExec had its coffee. Once coffee is up – run the install…. Logging optional.
This should run if the upgrade is successful. Not entirely sure how this works in reality – but Microsoft offers a success.cmd since 2004 so that would be a good idea to use.
Regardless what type of estate of Windows-devices, there always seems to be a need of clearing out unused profiles from a computer to save diskspace, increase performance and what not.
In Windows 7 there was an issue (resolved by a hotfix) that simply loading up a ntuser.dat file would change the timestamp of when it was last written to. It seems that this has now been the defacto default behaviour for Windows 10, and a long-running thread disusses different ways of adressing the issue – how can you identify if a profile was recently used on a device? Nirsoft tools (aren’t they great?) provide a great and easy to read overview if logon history based on security event logs.
That seems tedious. Using the written time for the folder doesn’t seem to be accurate – and the risk of removing active user profiles is high. However, if one could track the last-write time for the registry entry for the profile – we should be good, right? Unfortunately – last write time for the registry entry isn’t there out of the box using Powershell (or VBScript etc). Seems to be a few things posted on Technet Gallery (to be gone soon) that will provide the missing piecies.
Where are we looking? Right here;
Use the function Add-RegKeyMember, loop through all profiles and then filter any potential things you want to leave behind – and we should be able to clear out not so active profiles. A few dangerous lines commented out so you can copy and paste at will.
function Add-RegKeyMember {
 <#
 .SYNOPSIS
Adds note properties containing the last modified time and class name of a
registry key.

.DESCRIPTION
 The Add-RegKeyMember function uses the unmanged RegQueryInfoKey Win32 function
 to get a key's last modified time and class name. It can take a RegistryKey
object (which Get-Item and Get-ChildItem output) or a path to a registry key.

.EXAMPLE
 PS> Get-Item HKLM:\SOFTWARE | Add-RegKeyMember | Select Name, LastWriteTime

Show the name and last write time of HKLM:\SOFTWARE

.EXAMPLE
 PS> Add-RegKeyMember HKLM:\SOFTWARE | Select Name, LastWriteTime

Show the name and last write time of HKLM:\SOFTWARE

.EXAMPLE
 PS> Get-ChildItem HKLM:\SOFTWARE | Add-RegKeyMember | Select Name, LastWriteTime

Show the name and last write time of HKLM:\SOFTWARE's child keys

.EXAMPLE
 PS> Get-ChildItem HKLM:\SYSTEM\CurrentControlSet\Control\Lsa | Add-RegKeyMember | where classname | select name, classname

Show the name and class name of child keys under Lsa that have a class name defined.

.EXAMPLE
 PS> Get-ChildItem HKLM:\SOFTWARE\Microsoft\Windows\CurrentVersion\Uninstall | Add-RegKeyMember | where lastwritetime -gt (Get-Date).AddDays(-30) |
 >> select PSChildName, @{ N="DisplayName"; E={gp $_.PSPath | select -exp DisplayName }}, @{ N="Version"; E={gp $_.PSPath | select -exp DisplayVersion }}, lastwritetime |
 >> sort lastwritetime

Show applications that have had their registry key updated in the last 30 days (sorted by the last time the key was updated).
 NOTE: On a 64-bit machine, you will get different results depending on whether or not the command was executed from a 32-bit
       or 64-bit PowerShell prompt.

#>

    [CmdletBinding()]
     param(
         [Parameter(Mandatory, ParameterSetName="ByKey", Position=0, ValueFromPipeline)]
         # Registry key object returned from Get-ChildItem or Get-Item
         [Microsoft.Win32.RegistryKey] $RegistryKey,
         [Parameter(Mandatory, ParameterSetName="ByPath", Position=0)]
         # Path to a registry key
         [string] $Path
     )

    begin {
         # Define the namespace (string array creates nested namespace):
         $Namespace = "CustomNamespace", "SubNamespace"

        # Make sure type is loaded (this will only get loaded on first run):
         Add-Type @"
             using System;
             using System.Text;
             using System.Runtime.InteropServices;

            $($Namespace | ForEach-Object {
                 "namespace $_ {"
             })

                public class advapi32 {
                     [DllImport("advapi32.dll", CharSet = CharSet.Auto)]
                     public static extern Int32 RegQueryInfoKey(
                         Microsoft.Win32.SafeHandles.SafeRegistryHandle hKey,
                         StringBuilder lpClass,
                         [In, Out] ref UInt32 lpcbClass,
                         UInt32 lpReserved,
                         out UInt32 lpcSubKeys,
                         out UInt32 lpcbMaxSubKeyLen,
                         out UInt32 lpcbMaxClassLen,
                         out UInt32 lpcValues,
                         out UInt32 lpcbMaxValueNameLen,
                         out UInt32 lpcbMaxValueLen,
                         out UInt32 lpcbSecurityDescriptor,
                         out Int64 lpftLastWriteTime
                     );
                 }
             $($Namespace | ForEach-Object { "}" })
 "@

         # Get a shortcut to the type:
         $RegTools = ("{0}.advapi32" -f ($Namespace -join ".")) -as [type]
     }

    process {
         switch ($PSCmdlet.ParameterSetName) {
             "ByKey" {
                 # Already have the key, no more work to be done :)
             }

            "ByPath" {
                 # We need a RegistryKey object (Get-Item should return that)
                 $Item = Get-Item -Path $Path -ErrorAction Stop

                # Make sure this is of type [Microsoft.Win32.RegistryKey]
                 if ($Item -isnot [Microsoft.Win32.RegistryKey]) {
                     throw "'$Path' is not a path to a registry key!"
                 }
                 $RegistryKey = $Item
             }
         }

        # Initialize variables that will be populated:
         $ClassLength = 255 # Buffer size (class name is rarely used, and when it is, I've never seen
                             # it more than 8 characters. Buffer can be increased here, though.
         $ClassName = New-Object System.Text.StringBuilder $ClassLength  # Will hold the class name
         $LastWriteTime = $null

         switch ($RegTools::RegQueryInfoKey($RegistryKey.Handle,
                                     $ClassName,
                                     [ref] $ClassLength,
                                     $null,  # Reserved
                                     [ref] $null, # SubKeyCount
                                     [ref] $null, # MaxSubKeyNameLength
                                     [ref] $null, # MaxClassLength
                                     [ref] $null, # ValueCount
                                     [ref] $null, # MaxValueNameLength
                                     [ref] $null, # MaxValueValueLength
                                     [ref] $null, # SecurityDescriptorSize
                                     [ref] $LastWriteTime
                                     )) {

            0 { # Success
                 $LastWriteTime = [datetime]::FromFileTime($LastWriteTime)

                # Add properties to object and output them to pipeline
                 $RegistryKey | Add-Member -NotePropertyMembers @{
                     LastWriteTime = $LastWriteTime
                     ClassName = $ClassName.ToString()
                 } -PassThru -Force
             }

            122  { # ERROR_INSUFFICIENT_BUFFER (0x7a)
                 throw "Class name buffer too small"
                 # function could be recalled with a larger buffer, but for
                 # now, just exit
             }

            default {
                 throw "Unknown error encountered (error code $_)"
             }
         }
     }
 }


             $profiles = Get-ChildItem "HKLM:\SOFTWARE\Microsoft\Windows NT\CurrentVersion\ProfileList" | Add-RegKeyMember | Select Name, LastWriteTime
             foreach ($p in $profiles) {

             if ($p.lastwritetime -lt $(Get-Date).Date.AddDays(-90)) {

                     $key = $($p.name) -replace "HKEY_LOCAL_MACHINE","HKLM:"
                     $path = (Get-ItemProperty  -Path $key -Name ProfileImagePath).ProfileImagePath
                     $path.tolower()
                     if ($path.ToLower() -notlike 'c:\windows\*' -and $path.ToLower() -notlike 'c:\users\adm*') {
                         write-host "delete " $path
                         #Get-CimInstance -Class Win32_UserProfile | Where-Object { $path.split('\')[-1] -eq $User } | Remove-CimInstance #-ErrorAction SilentlyContinue
                         #Add-Content c:\windows\temp\DeleteProfiles.log -Value "$User was deleted from this computer."
                     }

                }
             }
EnableFastFirstSignin seems to be a semi-announced feature that is only possible to configure using a Provisioning Package. I think the official documentation states that it is in preview.
After this the awesome experience should be on whatever endpoint you installed this on. As far as I can tell all that remains is Group Policy Object processing.
What happens in the background?
What does this magical black box of awesomeness actually do in the background? Microsoft has little to reveal, however quite a few people have posted findings on Twitter so far
Interesting stuff! According to https://t.co/tERbDEepP8, Fast First Signin pre-creates a “candidate profile” (thus the speedup), but may only work with Shared PC Mode, which might not be something to go into blindly: https://t.co/cLWzhXjhWL. Below are the policies set by the PPKG pic.twitter.com/rZGVGPXYIs
Trenteye seem to be digging into this further and this is what has been shared so far;
It overrides 6 packages and changes their “SetupPhase” — that is when AppX will process them. Undoubtedly, when you tested this these 6 packages might have been the only packages in this stage, but not anymore.
And similar gains are made because EnableFastSignIn disables Windows Hello for Business… Which might be related to the AAD BrokerPlugin ? pic.twitter.com/DMB8zJ9tBa
OneDrive receives some well deserved attention in every upgrade of Windows 10. The road to an exciting user experience is paved with some hiccups, but once 1709 came around – most of the quirks were sorted out.
OneDrive is still seen in the system tray as two clouds (blue for OneDrive for Business and white for the personal edition). Spotting them in the task manager reveals a different confusion still.
One of the advocated new improvements is the ability to maintain sparse-files, or pointers, or – well, the point beeing; the file is not on disk and will only be retrieved from the cloud when needed (or requrested). The ability needs toggling under the Settings for each cloud (business or personal) and named Files On-Demand (or this can be enabled via group policy per machine)
Technically Files On-Demand is an attribute set for each file. The state is called Pinned or Unpinned and can be toggled via the “attrib” command. No idea why they chose to maintain an older command rather than enabling this via Powershell only. To make files available offline; attrib -U +P /s
The end-user isn’t required to know this and can toggle the options from right-click option when selecting any file or folder. The names aren’t the same, but rather offer a more end-user friendly name.
Applying the Free up space option will clearly show the progress of altering the attribute by saying Applying properties….
As a way to educate the user and offer a clear view of the state of any folder (offline, online, issues or syncing) there is a new column added (as opposed to the previous overlay on the icons) named Status. Personally this seems to be an improvement (allows for sorting for example).
Remember the system tray icons? A bit more useful this time around – if you left-click them once the following status will be shown.
OneDrive for Business
OneDrive
The reason for this write-up is based on the experience of migrating all OneDrive content to OneDrive for Business. Odd thing once I was completed. (1) is the OneDrive for Business and (2) is OneDrive. For some reason the consumption of data differs with just above 100gb. Where did this go? The below is from settings of the OneDrive-client.
Comparing the folder on disk looks like this shows that both are roughly 237gb – so this seems odd. Verifying online via the Manage Storage button shows some correct numbers and verifiying basic folder structure from the web-interface provides some additional confidence. Accessing the OneDrive for Business via the admin-center for Office 365 and spinning up the Reports for usage – shows that 8mb is currently consumed?
Are there any more ways to confirm how much data I got?
As OneDrive for Business is essentially a glorified interface for Sharepoint – there are certain limitations defined. There are restrictions on files both in OneDrive and OneDrive for Business, however OneDrive for Business has far more annoying limitations. Sample output to resolve the 181 conflicts – a number far lower than expected to be honest.
Every single project…. every single firewall guy, and every single requirement list that I had to dig into…
Windows Management Traffic leverages the same ports as RPC traffic (TCP 135 for initial connection, and after that a random port within a defined port-range), however it does not adhere to the RPC specification and will therefore not be correctly identified by any firewall (yes, any firewall) as RPC traffic. Most firewalls tries to dynamically identify the specific port for the session within the dynamic range, however this requires that lots of things are RPC and not MSRPC.
Cisco wrote it pretty clearly;
As Microsoft switched from using pure RPC to use DCOM (ORPC) calls, those non-epm calls will be used more and more. Windows RPC/DCOM services use the RPC Endpoint Mapper to accept initial communications on port 135 and then dynamically transition to ports for the service.
Oh, the joy of reusing technology. Office 365 leverages the App-V technology, however slightly modified and primarily used as a delivery method with no isolation. App-V in comparision is used more for its isolation and to be honest – not so much for its delivery mechanism.
In addition – since Windows 10 – 1607 the App-V client is now a Windows Feature.
Now, for fun – lets try these steps;
Install Windows 10 – 1607
Install any version of Office 365 ProPlus
Find a Visio drawing and open it. Most likely it will be opened with the Visio Viewer – which is a component part of Office 365 ProPlus. Visio Viewer is just an ActiveX component and will therefore load the drawing inside Internet Explorer 11.
let’s add a third-step to this process….
3. Open an elevated Powershell prompt and type Enable-AppV. Press the enter-key
Once you attempt to re-open the Visio-drawing you will most likely see a blank Internet Explorer-page instead of the Visio Viewer ActiveX component. The below is from a minimal window.
By default, Explorer.exe and Internet Explorer are listed there. Therefore, when the iexplore.exe process runs, it has the APPVEntsubsystem32.dllloaded in Internet Explorer. When Office C2R detects that APPVEntsubsystem32.dll is loaded into Internet Explorer, it does not load jitv.dll or APPVISVSubsystem32.dll into Internet Explorer. As a result, there is no registry redirection support.
When the JavaScript that’s running in Internet Explorer tries to create any ActiveX objects that are part of the Office C2R package, that operation fails and the Office C2R and SharePoint integration are broken. Office C2R and App-V dynamic virtualization aren’t designed to co-exist; therefore, Office C2R disables Dynamic Virtualization when it detects that AppV client binaries are loaded in Internet Explorer to prevent double hooking.
The article unfortunately provides no fix for a Windows 10 – 1607 unless someone is wanting to decrease the feature set for App-V. Browsing the web allows a little gem to be spotted in the comment section of Dan Gough’s amazing blog – the comment is from an Andrew G:
and also there is a registry key suggested by MS:
HKEY_LOCAL_MACHINE\SOFTWARE\Microsoft\ClickToRun\OverRide
keyname=AllowJitvInAppvVirtualizedProcess (reg_dword)
keyvalue=1
Searching for this registry key on google presents only a few results (one spiceworks thread) are found. A hidden gem, I presume?
Add the registry key and immediately the Visio drawing can be opened without issues
2017-08-22 Update
According to Roy Essers – these registry keys will be automatically created on Windows 10 – 1703
Fun isn't it, on 1703 with O365 Ive noticed the key will be created as soon an office component starts.


